Setting up store-level discount for the outlet
important
The details provided by you, while setting up these sections on QRkey systems reflects/displays on the customer interface as well. Hence, it is important to ensure that these details are accurate, error-free and qualify for client exposure.
note
Note that a store-level campaign is different from that of a product-level/order-level discount. A store-level discount is primarily designed for store campaigns, for promotions on customer interface etc. Discounting at the order-level or item-level are impromptu service delivery features.
Some store-level campaign scenarios for your ready reference
Example
Restaurant A wants to promote a 15% discount on all orders placed between 6 pm to 11 pm during the Christmas week. This offer is available for orders received both via the customer interface and offline channels.
Example
Restaurant B wants to promote a 10% discount on all orders placed via the customer app. Setting up such a campaign could be managed by creating a coupon code available to customers to apply when they order using the customer interface.
Example
Restaurant C wants to promote a 10% discount on only takeaway orders placed via the customer interface. Setting up such a campaign could be managed by creating a coupon code available for application only on takeaway orders placed via the customer interface. This will ensure that this coupon will be visible for use only when a customer chooses to take away his order and places the order using the customer interface.
note
One may create multiple store-level campaigns running at the same time and customize their availability to customers as per the objective of the drive at the outlet.
Click Store Discount from the entity settings menu options to start setting up a store campaign for the outlet, and integrated with the QRkey systems. Outlets may have different campaign requirements depending on their type of operations.
- Click the
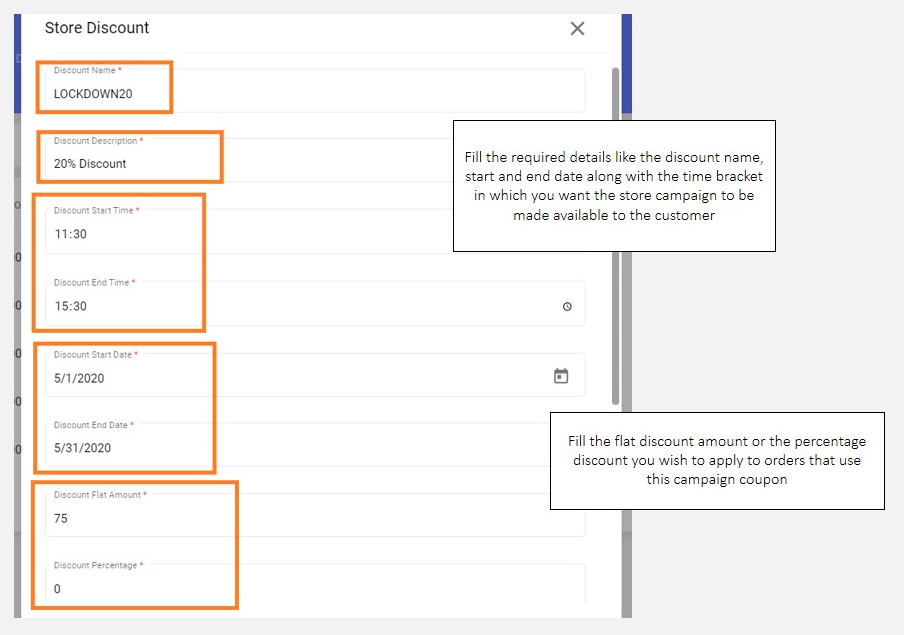
+add button on your screen - Assign a name to this campaign, appropriate for the occasion and drive. We recommend using common and exciting campaign names, to drive customer attention and relatability.
- Proceed to describe the campaign in not more than 25 characters. Short and catchy descriptions work best for customers
- Select the time and date range for which you want the campaign benefits to be available to customers. This campaign will remain active only in the defined time range for the dates specified in the date range
- Define the discount amount - Flat or percentage.
Store discounts should have its calculation logic defined appropriately. An outlet can either apply a flat discount on the bill or can have a percentage of the bill amount discounted as a part of the campaign. Either way, the user will have to fill the required calculation logic details in the respective fields. If an outlet chooses to apply a flat discount, they will have to fill the flat discount value in the
Flat amountcolumn and0(zero) in thePercentage Discountcolumn or vice-versa. - Select the service sections for which this charge category is applicable
- Define the coupon code which you would want your customers to select on the customer interface to be able to avail this discount. The coupon code gets displayed to customers as-is. Hence, ensure that these details are accurate, error-free and qualify for client exposure.
- One may choose not to display the coupon code on the customer interface by simply selecting the
Nooption under theDisplay Offer on Appsegment. The coupon will stop showing in the customer view - One may choose to place and display the current campaign on the outlet listing page of the customer interface by selecting the
Yesoption under thePromote this offer on Appsegment
Example
Note: Only one campaign can be selected for display on the listing page. Hence choose the most appropriate campaign wisely. The response to this segment for all other scenarios should be No
- Mark the Store Discount active and click
Update Store DiscountNote: Information submitted here will be utilized to auto manage campaign availability both for the partner portal and online ordering scenarios.

Setting up section level prices, discount, availability and taxation
In this segment, an outlet can update
- Section-wise, menu item-level prices
- Section-wise, item-level discount; both flat or percentage
- Section-level availability/unavailability of items
- Menu category-wise Taxation
Updating Section-level Prices
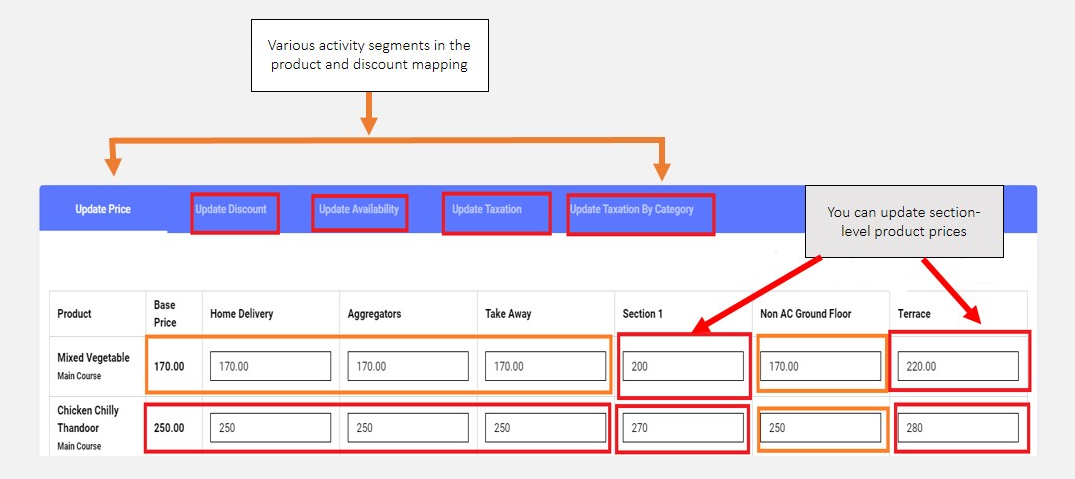
Click Product Discount Mapping from the entity settings menu options, and visit the Pricing Update segment to start setting up section-level prices for the outlet, and integrated with the QRkey systems. Outlets may have different product prices for different service sections depending on their type of operations.
- The base price of each menu item is listed alongside their names. The system treats the base price as the default section-level price for an item unless section-level prices for each menu item is updated in this segment
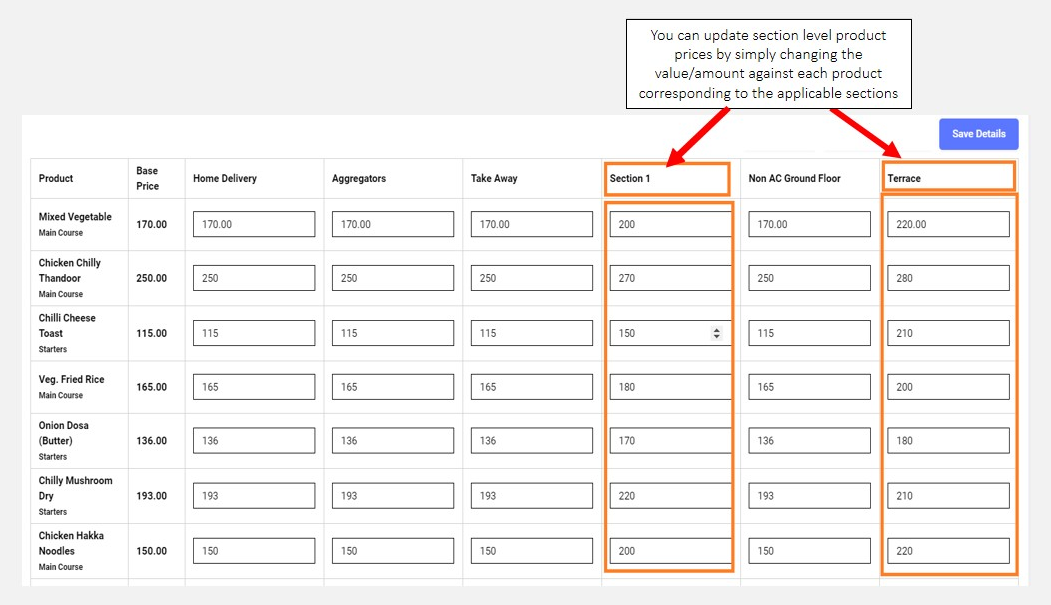
- To update section-level prices of each item, simply double click the respective editable cell against each item coinciding with the applicable section name and fill the applicable prices.
- Once the prices for items in their respective sections have been updated, proceed to save these changes. The system pops-up a page displaying the details of changes incorporated. We recommend you review these details at this stage before you proceed to submit them for publishing.
Setting up product-level discounts, availability and taxation
Click Product Discount Mapping from the entity settings menu options. Proceed to click the arrow sign next to the section name to expand the options that allow updating item-level discount and availability of items in the section
- To update discount on items in the selected section, simply double click the respective editable cell against each item coinciding with the discount column and fill in the discount %age to be applied on the item
- To update and mark an item unavailable for the selected section, simply uncheck the column cell against item coinciding with the availability column. When available, come back and check the box and save changes.
- These separate availability/unavailability options are designed for different operational scenarios- Unchecking both the staff and customer availability option makes the item unavailable for ordering both on the staff and customer interface. Unchecking only the customer option, however, keeps the item available for ordering on the staff interface but makes it unavailable for the customer to order via the customer interface.
- To update item-level taxation on products in the selected section, simply click the respective editable cell against each item coinciding with the Taxation column and select the tax categories to be applied on the item.